What is Exposure in Photography? (Perfect for Beginner’s)
Are you new to photography?
If so, you’ve probably already heard a lot of photography jargon that’s not easy to understand.
But don’t worry, you’re not alone!
Every photographer goes through a phase of learning. And at some point, we’ve all had to learn photography definitions, take bad photos, and felt confused about how to use our equipment.
Of course, learning and knowing the complex parts of photography will improve your skills. But like everything else, we need to learn and master the basics before our photography gets better.
So let’s learn and talk about exposure in photography. A fundamental aspect of photographs that determines the brightness or darkness of an image.
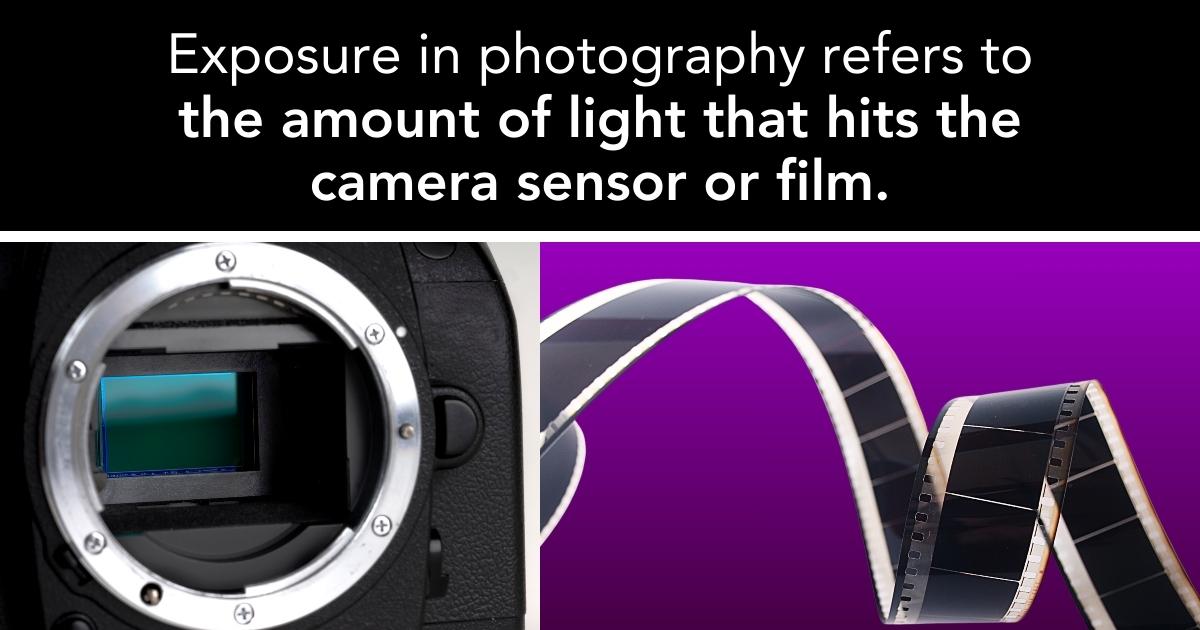
In simple terms, exposure refers to the amount of light that enters your camera and hits the image sensor or film.
Personally, I believe there are no rules in photography.
There are only guidelines for understanding how the elements of photography work, and baseline information and steps.
Information and steps needed for achieving specific looks in photography.
But for the sake of this article, we’ll be going over Exposure the same way a teacher would, so you’ll know:
- What it is
- How it works
- And what you should know to take well-balanced photos.
To achieve well-balanced exposure in your pictures, you need to adjust your camera’s aperture, shutter speed, and ISO settings. Which is an ongoing process.
If you’re a beginner, it’ll take time and lots of practice in different lighting scenarios to get things just right.
But the more you practice and understand each setting on your camera, the faster you’ll get at adjusting the exposure to your liking. Regardless of the lighting condition.
What is Exposure in Photography?
The amount of light affects how light or dark your photos will turn out and what kind of detail you can capture.
If your photo is underexposed, it will appear really dark and lack detail. And if your photo is overexposed, it will appear really bright and lose detail in the highlights.
An evenly-exposed photo will have a balanced distribution of light and shadow, while an underexposed or overexposed photo will have too much or too little light.
The exposure of a photo is controlled by three primary camera settings:
Shutter speed, aperture, and ISO.
Shutter speed refers to the amount of time the camera’s shutter remains open, allowing light to reach the sensor. A longer shutter speed will allow more light to reach the sensor, resulting in a brighter image, while a shorter shutter speed will cause a darker image.
Aperture refers to the size of the opening in the lens that controls the amount of light that enters the camera. A wider aperture will allow more light to enter the camera, resulting in a brighter image, while a narrower aperture will create a darker image.
ISO is a measurement of the sensitivity of your camera’s image sensor to light. It allows you to adjust the sensitivity of your camera to light, giving you more control over your photos in different lighting conditions. By increasing the ISO, you can capture brighter photos without using a flash. And, if you’re shooting in bright sunlight, lowering the ISO will help you avoid overexposure and maintain image quality.
So as you’re taking your photos, getting the proper exposure is a balancing act among these three settings.
And by manipulating the exposure, you can create different moods and atmospheres, from bright and airy, to dark and moody.
Overexposed vs Underexposed vs Well-Balanced Exposure
Overexposed photos are those that appear too bright and have lost detail in the highlights. This can happen when too much light hits the camera’s sensor, resulting in blown-out highlights. Overexposure can be caused by using a shutter speed that is too fast, an aperture that is too wide, or an ISO that is too high.
Underexposed photos are those that appear too dark and have lost detail in the shadows. This can happen when there is not enough light hitting the camera’s sensor. Underexposure can be caused by using a shutter speed that is too slow, an aperture that is too narrow, or an ISO that is too low.
Well-Balanced Exposure is when the photo has a balanced amount of light, with detail in both the highlights and shadows. This can be achieved by adjusting the aperture setting, shutter speed, and ISO to get the right amount of light hitting the camera sensor.
Quick Note: Overexposed and underexposed photos can sometimes be intentional creative choices.
Regardless, it’s still important to understand how to achieve the right exposure in order to have control over your images as a photographer.
How Does Exposure Affect Your Photos?
Hopefully, it’s pretty obvious by now to see that exposure in photography significantly impacts the brightness or darkness of your photos.
Exposure is all about light, and without light, photography would not be possible.
To better understand this, picture yourself in a dimly lit room with just a tiny spotlight.
The spotlight throws a small amount of light (limited exposure), making it difficult to see the details in the dark corners of the room.
To get the right exposure, you need to master the trio of exposure components: aperture, shutter speed, and ISO. They each influence the amount of light your camera sensor captures.
The aperture is your camera’s “iris.” Its wider or narrower opening determines how much light enters. Want a brighter photo? Open the aperture wider.
Shutter speed affects the duration where your camera sensor is exposed to light. The slower the shutter speed, the more light comes in, making your photo brighter.
ISO denotes your camera sensor’s light sensitivity. A higher ISO makes your camera more sensitive to light, leading to brighter photos.
Finally, keep in mind that getting the right exposure is like juggling.
As the juggler, you want to keep all balls up and moving. You don’t want to let any fall or rise too high.
The Exposure Triangle
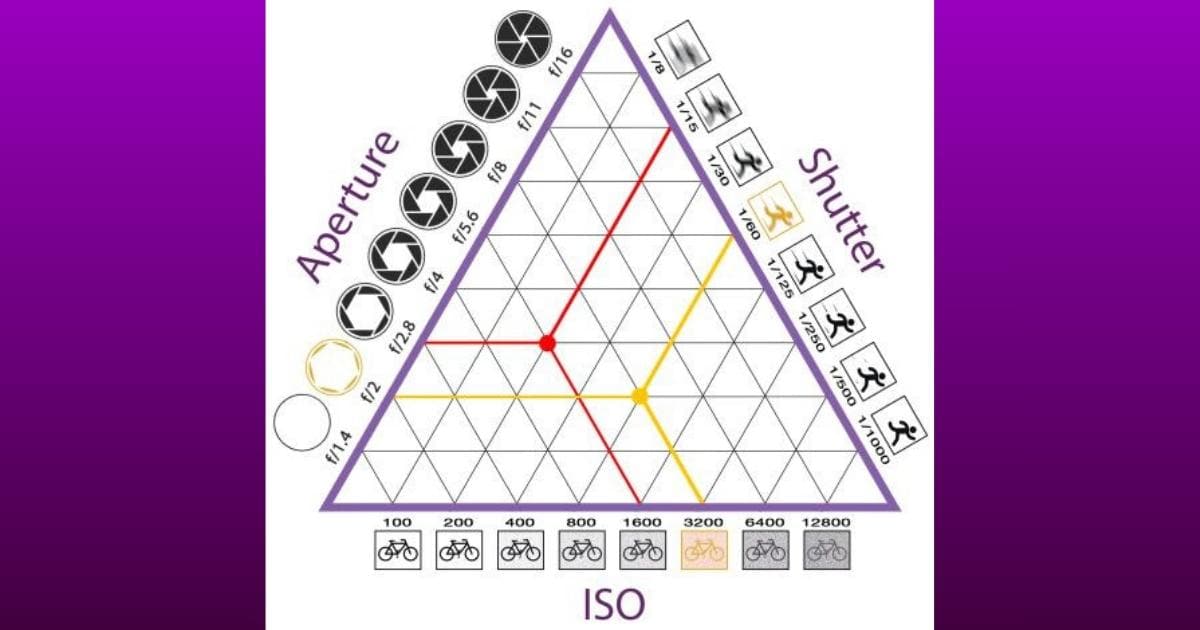
The Exposure Triangle is a term, and a visual graph photographers use to better understand the exposure they’re trying to achieve in their photography.
It consists of all three camera settings we previously went over (shutter speed, aperture, ISO) which are placed on each side of a triangle.
To properly use the Exposure Triangle it’s important to know how each camera setting works and how changing them will affect your images.
Shutter Speed
As stated, shutter speed refers to the time the camera’s shutter is open.
This also affects the amount of light that’s let into the camera within those fractions of a second.
- A faster shutter speed lets in less light
- A slow shutter speed lets in more light
Shutter speed also affects how motion is captured in a photo.
- A fast shutter speed can freeze motion
- A slower speed can create motion blur
Shutter Speed is a big element sports photographers would focus on when considering the Exposure Triangle.
Because they have to capture athletes or race cars and action in motion.
Aperture
Aperture refers to the size of the opening in the lens that lets light into the camera and is measured in f-stops.
The best way to understand the function of the aperture setting is by knowing what a smaller f-stop effects vs. a larger f-stop.
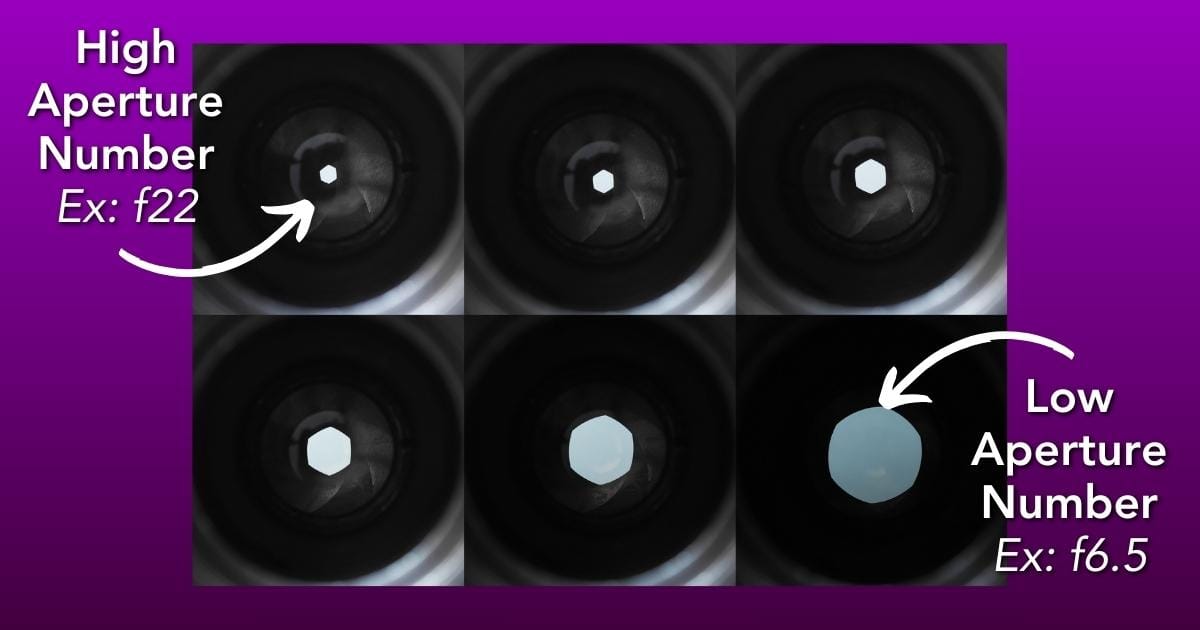
Smaller f-Stop:
- Wider aperture (ex: f1.4)
- Your lens lets in more light
- Is displayed on your camera as a lower number
- Shallower depth of field, which means less is in focus on your camera
- Ideal for portrait photography (your subject’s face is sharp, background is blurred)
Larger f-stop:
- Narrow aperture (ex: f22)
- Your lens lets in less light
- Is displayed on your camera as a higher number
- Larger depth of field, which means more is in focus on your camera
- Ideal for landscape photography (everything is in focus, from the grass near the camera to the mountains far away)
ISO
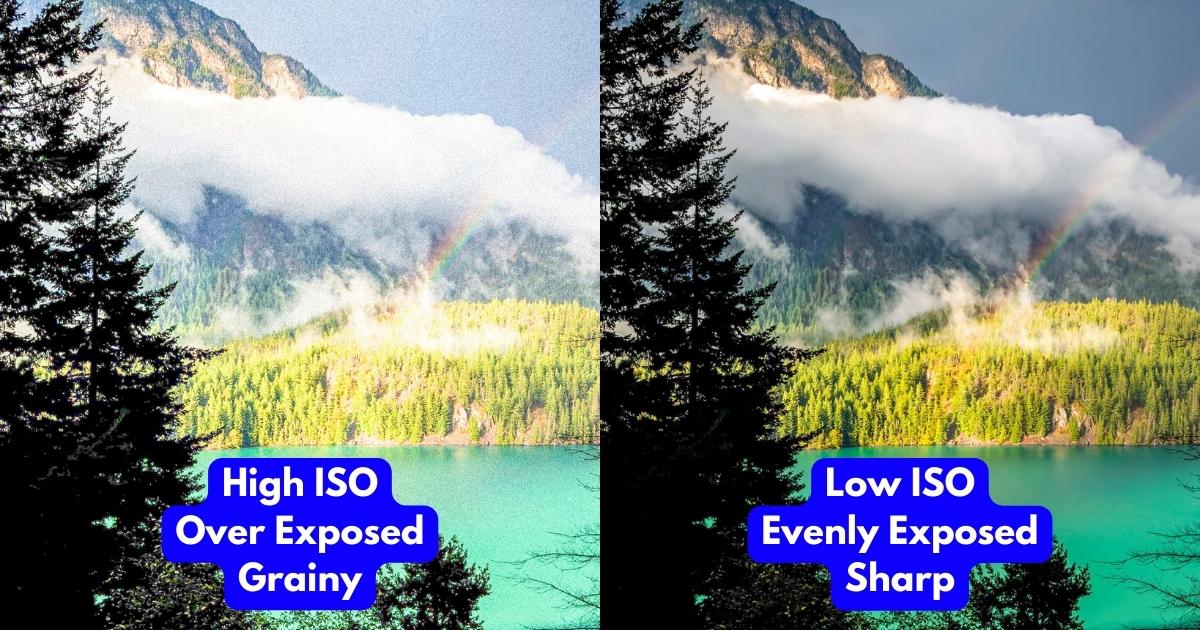
ISO refers to the sensitivity of the camera’s sensor to light. This setting is adjusted based on the ambient light (the lighting situation of the atmosphere) whether indoors or outdoors, day, or night.
High ISO:
- Camera is more sensitive to light
- More noise (graininess) will be in the photos
- This adjustment is necessary in dark or low-light situations
Low ISO:
- Camera is less sensitive to light
- Photos will appear more smooth (less noise)
- This adjustment is necessary in bright or harsh-light situations
I suggest staying at an ISO of 800 and under to avoid introducing noise into your photos. If your ISO needs to be higher, 1000-1600 is my max.
Then I’ll start considering adding a flash attachment to supplement.
How to Use The Exposure Triangle
The Exposure Triangle is like a visual recipe photographers look at to achieve a specific look for their photography.
And the ingredients for your recipe are the 3 camera settings we went over: shutter speed, aperture, and ISO.
Now that you know what each setting is used for, you’ll know what adjustments you need to make based on the type of photography you’re doing.
One rule of thumb is to make adjustments with either your shutter speed or aperture. And your ISO should be high enough to see your subject on your camera’s display.
So let’s use an example:
Setting: Outdoors on a really sunny day.
The first thing you can adjust is your aperture so you can control the amount of light you’re letting into your camera. f1.4 – f5 would be ideal for this lighting situation if you’re taking photos of something/someone up close.
For group shots or pictures of a landscape, you’ll want a higher f-stop to make sure everything in the photo is sharp and in focus.
The next thing you could change is your shutter speed.
A faster shutter speed would be ideal as well. If you want to shoot with a slower shutter speed, a tripod will help with avoiding motion blur.
And finally, for your ISO, I would start between 100 – 500 and make adjustments from there. Remember, the higher the ISO, the more noise you’ll introduce to your photos.
Photography Exposure Metering and Exposure Compensation
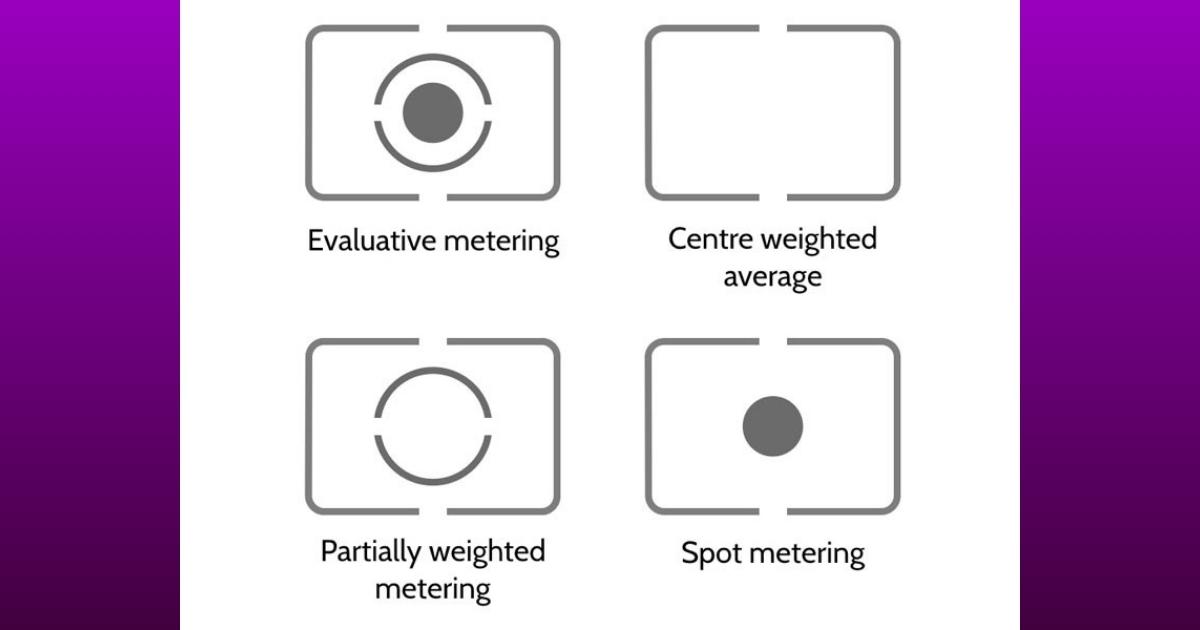
Exposure metering is the process of measuring the amount of light in a scene to determine the optimal exposure settings for your camera.
And exposure compensation is a feature that allows you to adjust the exposure settings to achieve the desired brightness or darkness of your image.
Spot Metering
Spot metering is a metering mode that measures the light in a small area of the scene.
It’s useful when you want to expose for a specific part of the scene, such as a person’s face.
With spot metering, you can ensure that the subject is correctly exposed, even if the rest of the scene is too bright or dark.
Center-Weighted Metering
Center-weighted metering is a metering mode that measures the light in the center of the scene.
Center-weighted metering in photography is your go-to mode when lighting conditions get tricky.
This feature focuses on the exposure at the center of your frame and blurs out the rest – perfect for enhancing your main subject against a soft backdrop.
It’s useful when you want to expose for the subject in the center of the frame. With center-weighted metering, you can ensure that the subject is correctly exposed, even if the rest of the scene is too bright or too dark.
Try it when capturing portraits for instance, and you’ll notice how it gives your model an appropriate exposure amid a creamy background.
I’d also like to note this mode is at its best with well-lit shots. With center-weighted metering, staying focused really pays off.
Matrix or Evaluative Metering
Matrix or evaluative metering is a metering mode that measures the light in the entire scene.
It’s like your camera is taking an average. Splitting the frame into different areas, and calculating the exposure value based on overall brightness. So, both your highlights and shadows hold details without one overpowering the other.
It’s useful when you want to expose for the entire scene, such as a landscape.
With matrix or evaluative metering, you can ensure that the entire scene is correctly exposed, even if there are bright or dark areas in the scene.
Using Histograms for Precise Exposure Evaluation
Histograms are a visual representation of the brightness levels in your image.
They can help you evaluate your exposure by showing you if your image is overexposed, underexposed, or correctly exposed.
A histogram with a peak on the left side shows an underexposed image, while a histogram with a peak on the right side indicates an overexposed image.
And a histogram with a peak in the middle shows a correctly exposed image.
Using a histogram for precise exposure evaluation makes taking photos with proper exposure easier.
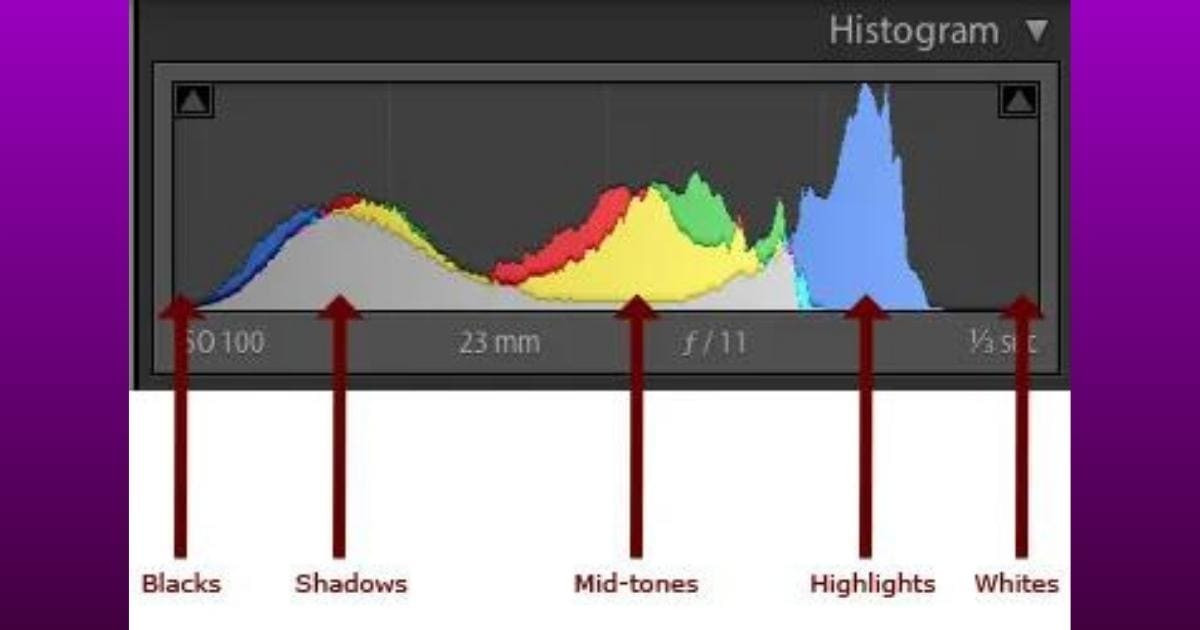
Here’s how to do it:
After taking a shot, head to your DSLR camera’s histogram. This resembles a wave within a rectangle.
The wave’s position shows the exposure levels. If it leans left, your photo is underexposed. Right-leaning indicates overexposure.
Aim for a wave evenly split across the histogram, signifying correct exposure.
Remember, each scene or setting adjustment calls for a histogram check.
Don’t be afraid to use your judgement. It’ll require some trial and error.
Pro Tip: Photography isn’t about memorizing settings, it’s about understanding concepts like histograms and exposure.
Once you understand basic photography concepts, you can make changes on the go. So keep practicing, and you’ll get the hang of it!
Exposure Settings in Different Lighting Situations
With photography, lighting is everything.
Different lighting situations can make it difficult to get the perfect exposure. So, here are some tips to help you adjust your exposure settings in different lighting situations.
Photography Exposure in Challenging Lighting Conditions
Use RAW format: They contain all image information producing better quality shots.
JPEG compresses the data/information of an image, which reduces the ability to edit an image. For example, if an image shot in JPEG format is overexposed or underexposed, there’s less “flexibility” to “save” the photo in post-production (i.e. editing). The image will most likely come out grainy or pixelated. But when shooting in RAW format, there’s more range in how you can edit an over or underexposed image.Low Light Conditions: In low light conditions, you will need to increase your ISO and open up your aperture to allow more light into the camera. You may also need to use a slower shutter speed, but be careful not to use a shutter speed that is too slow, as this can cause blurry photos.
Bright Light Conditions: In bright light conditions, you will need to use a lower ISO and a smaller aperture to prevent overexposure. You may also need to use a fast shutter speed to prevent overexposure.
Backlit Conditions: In backlit conditions, you will need to use exposure compensation to adjust for the bright light behind your subject. You may also need to use fill flash to balance the exposure.
Mixed Light Conditions: In mixed light conditions, you will need to adjust your white balance to match the different types of light. You may also need to use exposure compensation to adjust for the different levels of light.
Remember to experiment with your settings.
As you gain experience, you’ll soon be able to adjust your exposure settings quickly and easily to capture great photos in any lighting situation.
Common Exposure Challenges and Solutions
As a photographer, you may face several challenges with photo exposure. Here are some common challenges and solutions to help you overcome them.
Excessive Underexposure and Overexposure
Underexposure occurs when your image is too dark, while overexposure happens when your image is too bright. A few factors, such as incorrect camera settings or poor lighting conditions can cause these issues.
To fix underexposure, try increasing your shutter speed or aperture size, or adjust your ISO settings. For overexposure, decrease your shutter speed or aperture size, or lower your ISO settings.
Poor Understanding of the Exposure Triangle
The exposure triangle consists of aperture, shutter speed, and ISO. It’s essential to understand how these three elements work together to create the perfect exposure.
If you’re struggling to grasp the concept, try using a cheat sheet or online tutorial to help you master the exposure triangle. Once you understand it, you’ll be able to adjust your settings with ease.
Not Using the Right Camera Settings
Your camera has settings for different situations like portraits, landscapes, and low light. Not using the right settings can lead to poor exposure and other issues.
To avoid this, take the time to learn about your camera’s settings and when to use them. Experiment with different settings to find the best ones for your needs.
Ignoring the Lighting Conditions
Lighting is a critical factor in photography, and ignoring it can lead to over-or underexposure, as well as other issues.
To avoid this, pay attention to the lighting conditions and adjust your settings accordingly. Use a reflector or flash to add more light if necessary, or move to a different location if the lighting is too harsh or too dim.
The Creative Use of Exposure
Once you’ve mastered the basics of lighting and exposure, you use your knowledge creatively. This will lead to unique and artistic photographs.
Here are some creative ways to use exposure in your photography:
Underexpose for a Dramatic Effect
This technique can create a dramatic effect by emphasizing shadows and creating a moody atmosphere. And it’s a good technique for capturing images of objects with strong shapes and textures, such as buildings or landscapes.
Overexpose for a Dreamy Look
Overexposure is when the image is brighter than what the camera’s light meter suggests. This technique can create a dreamy and ethereal effect by softening details and adding a hazy glow to the image. It’s ideal for capturing soft and delicate subjects, such as flowers or portraits.
Play With Multiple Exposures
Multiple exposures are when the camera takes two or more images on the same frame. This technique can be used to create interesting and surreal images by overlaying different subjects and perspectives. It’s very effective when photographing movement or creating a narrative.
Use Exposure Compensation
Exposure compensation is a feature in most digital cameras that allows you to adjust the exposure value up or down.
It is useful for fixing difficult lighting or creating a unique look. Especially when photographing subjects with bright or dark areas, such as sunsets or backlit scenes.
Long Exposure Photography
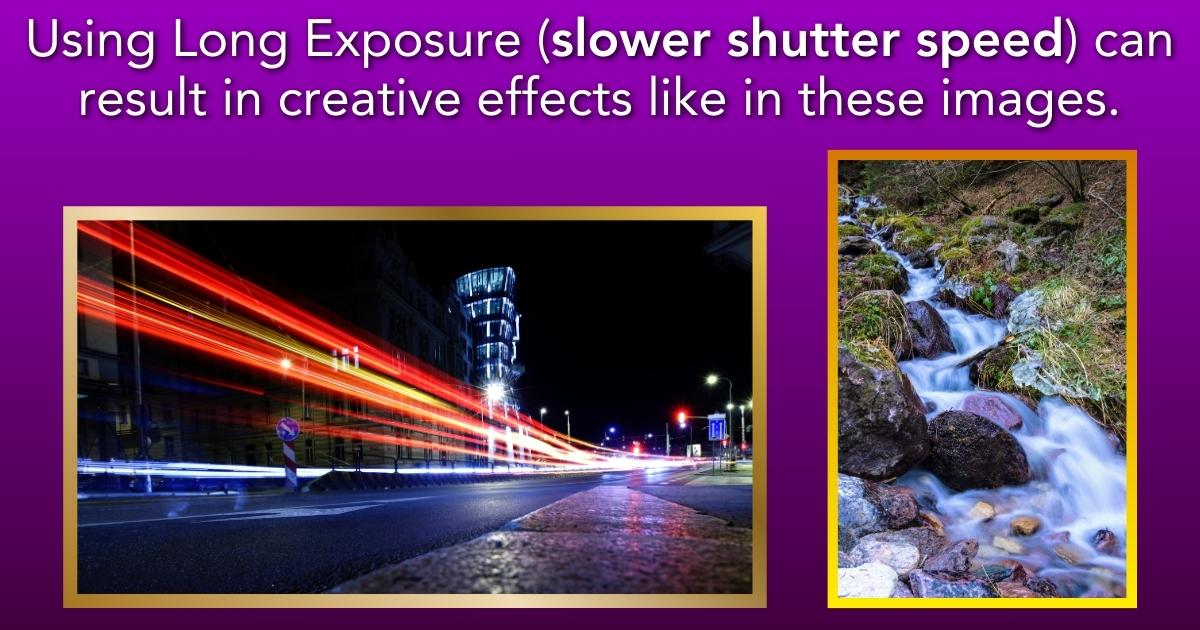
Long exposure photography is a technique that involves using a longer shutter speed to capture images.
By prolonging the exposure time, photographers can make stunning effects. For example, light trails, motion blurs, and smooth water or cloud movements.
In long exposure photography, a tripod is often used to keep the camera steady and avoid any unwanted camera shake.
You can also use neutral density filters to reduce the amount of light that enters the camera and take longer exposures in bright conditions.
Long exposure photography offers a unique way to portray movement and create artistic and ethereal visuals. It requires experimentation, patience, and an understanding of how exposure settings can affect the image.
So try it and explore the creative possibilities!
Tips for Taking Great Photos With Proper Exposure
Use a Camera That Has Manual Controls
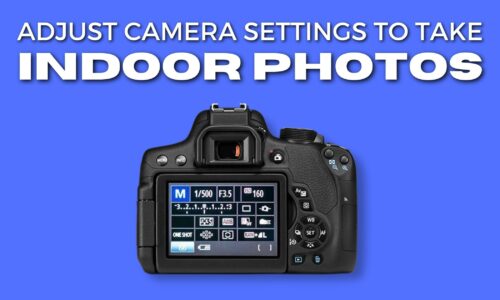
To take great photos with proper exposure, it’s important to practice using your camera in manual mode. This will allow you to adjust the aperture, shutter speed, and ISO settings to get the perfect exposure for your shot.
By using manual mode, you have more control over the exposure settings, which can help you achieve the desired effect for your photo.
Get Familiar With Your Camera’s Auto-Exposure Modes
Most digital cameras have auto-exposure modes that can help you get the right exposure for your shot.
Learn about your camera’s auto-exposure modes, including aperture priority, shutter priority, and program mode.
These modes can be very helpful when you’re just starting out with photography or when you’re in a hurry and don’t have time to adjust the settings manually.
Take Your Time to Experiment with Different Exposure Settings
To get the best exposure for your photos, it’s important to take some time to experiment with different exposure settings. Try adjusting the aperture, shutter speed, and ISO settings to see how they affect the exposure of your photos.
This will help you understand how the different settings work and how to use them to get the same exposure and desired effect for your photo.
Use Editing Software to Adjust Exposure
Even with the best camera settings, sometimes you may still need to adjust the exposure of your photos. This is where editing software can be very helpful.
Use editing software like Adobe Lightroom and Photoshop to adjust the exposure of your photos and make any necessary corrections.
