11 Tips to Take Great Professional Looking Photos
Before we dive in, I’d like to state that these tips can be applied to anyone who wants to take a picture.
Whether you’re an influencer with a smartphone, a photographer with a DSLR, or a grandma with a disposable wind-up camera.
However, many people don’t know where to start when it comes to improving their photography skills.
So in this blog post, we’ll discuss eleven ways to take professional looking photos using only your smartphone.
Let’s get started!
1. Clean Your Lens for Professional Looking Photos
One essential step for taking good professional looking photos is ensuring your lens is clean.
This means wiping off any smudges or fingerprints with a cloth before taking pictures.
Not only will this get you sharper photos, but it’ll also prevent any glare from affecting your shots.
2. Use a Tripod With Your Camera
A tripod is the way to go if you want to take steadier shots.
This will help to keep your camera in place and minimize any shaking or blurriness in your photos.
Influencers, this is a must-have if you’re taking your photos in different locations.
You can’t always expect a big rock to prop your phone on to be at your next location! Lol
3. Take Photos Using Natural Light
Whenever possible, try to take your photos outdoors in natural sunlight.
This will provide more flattering lighting, and help to reduce the amount of noise and graininess in your images.
The ideal times to shoot with natural lighting are during blue hour, golden hour, and when the sky is overcast. You should try and Google when these times are in your location.
4. Use the Gridlines on Your Camera App
Gridlines are helpful when you’re trying to take a balanced shot of architecture or want to align your subject at a specific angle.
This feature is built into most smartphone camera apps and digital cameras now.
5. Get Close to Your Subject
Some of the best photos are taken when the photographer gets up close and personal with their subject.
This can add a sense of depth and intimacy to your photos and create more interesting compositions.
Also, getting up close and personal will fill the frame, capture more details, and reduce the amount of noise and graininess in your images.
6. Experiment With Different Filters and Modes
Most smartphone camera apps come with various filters and shooting modes you can experiment with.
Trying out different combinations can often lead to interesting and unique results.
If possible, also correct your lighting, focus, and clear out distractions before taking the shot. I made that mistake when I first started.
I would say, “oh, I’ll just edit that out,” or “I’ll fix the brightness in photoshop.”
I’d end up with 15 images of the same piece of lint on a person, and then I would wonder why it took me so long to finish editing a client’s pictures.
So now I try to physically make things look good during a session BEFORE taking the shot (i.e., hair frizz, lint, lighting, camera settings) to save time in post-production.
The less editing you need to do, the better.
7. Don’t Take a Lot of Photos
This was a big one for me, and sometimes I still struggle to be mindful of how many images I take.
Be intentional when shooting.
Taking many pictures isn’t technically bad, but it’s not a good habit. As a professional who’s often on a time crunch, filtering through 20 images of the same pose can hinder my workflow and take an unnecessary time to narrow down to the best one.
Now I try to take 2-5 images of the same pose and look back to ensure I got the right shot.
It saves me a lot of time during the photoshoot and the editing process. Plus, I take my time more seriously and value the pictures I take.
So now, knowing how beneficial it is, I challenge you to do the same!
Try to take fewer photos than you did the last time. This gets you to work out that creative muscle and think strategically about your subject, their poses, and your time-management skills.
Remember less is more.
The fewer pictures you have of a specific moment, the more valuable they hold because those are the only ones in your camera.
Doing this will also be the best way for clients to truly value the professional looking photos you take of them.
8. Avoid Distractions When Taking Pictures
The goal is to have a clean shot with nothing in the picture that can take the attention away from your subject(s).
Again, remove the lint from their shirt if you see it at the moment. Please don’t ignore it!
Move or edit out any trash on the floor, boxes, papers, wires, cars, people, and objects with bright colors. If you’re shooting outdoors, avoid shooting near large objects that can take the attention away from your subject.
Or use the object to your advantage.
For example, if there’s a street light in the location you’re shooting at, have your subject lean against it or model around it.
But try to avoid the wires if shooting at an upward angle. This can also go for trees, fences, and telephone poles. Use it if you can’t avoid it, or edit it out of the image afterward!
9. Use Proper Lighting to Take Professional Looking Photos
The most common thing to do is shoot with the main light source behind you, beside you, or facing the subject.
But you can achieve many more creative shots by positioning your lighting differently!
I won’t go through all of the possibilities of what you can do, but I will show you a few of my favorite shots and poses I often use.
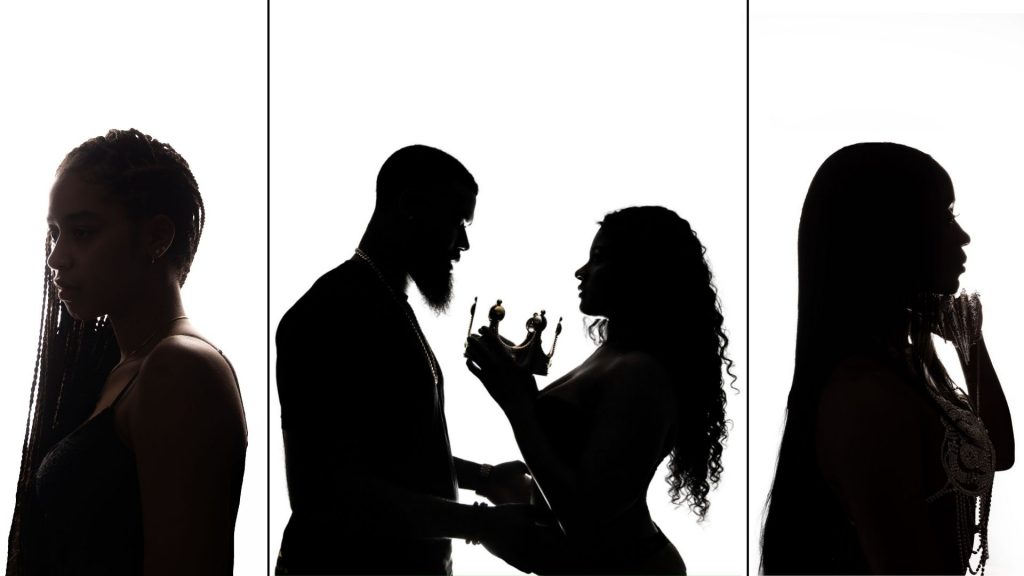
In my studio, I like to use this silhouette effect with my clients in case they love it!
I placed my light source behind them and brought my iso down. This idea is great for milestones and sentimental shots.
10. Your Angles Matter
Rule of thumb for beginners: shoot at a higher angle if the subject is a woman. And shoot at a lower angle if the subject is a man.
This is because shooting down from a higher angle is more flattering and gives the illusion that the woman is smaller.
I do this when my client is a little insecure about their body and joke about “Photoshopping 10 pounds off.” They’re beautiful as they are. And I just show them what they look like from a different perspective that’s more flattering than what they’re used to seeing.
For men, shooting up from a lower angle gives the impression of being powerful, dominant, and larger.
I still encourage you to experiment and be creative with your angles, despite the gender of the subject. Ultimately it’s about the photo looking good and being creative in your own way.
11. Aesthetic
This is important if you’re trying to get more likes, attention, engagement, or clients from the photos you share.
- What style are you going for?
- What do you want to be known for?
- How do you want others to perceive you?
If you don’t care about this stuff or how people view you and just want to take photos for fun, then completely disregard this advice.
Consider the style and colors you gravitate towards as a photographer, influencer, or creator.
For example:
- Black and white
- Dark and moody
- Warm and grainy
- Clean and simple
- Bright and colorful
If your photos look all over the place and you’re unsure what style or aesthetic you’d like to be identified as, make a Pinterest board of the type of photography you want to shoot.
Save at least 10-20 pins and look at it zoomed out to get a good idea.
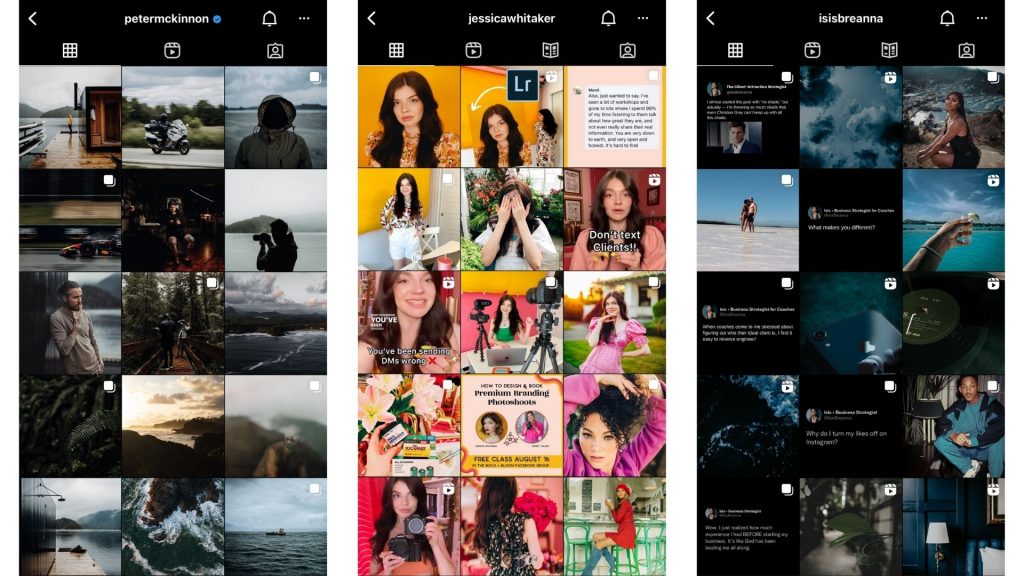
Or you can look at other people’s Instagram grids that look good to you and use them as inspiration for your photography style.
This is another great way to start thinking more strategically with your shots versus shooting anything that looks good and hoping it’ll work well with the rest of your content when posted.
